Last week, two friends of mine came to visit Berlin. They've both been living out of the US, for over a year, which means they haven't had decent Mexican food in at least that long. And I'd been dying for an excuse to cook for a bunch of people.
The Menu:
Shredded pork, refried beans, mild salsa, spicy roasted red pepper salsa and HOMEMADE CORN TORTILLAS. Oh man. My stomach still hurt two hours later, and even with that I had to forcibly refrain from chowing down on leftovers.
This is home-style cooking the way it's meant to be. When I cook like this, I devote an entire day to it. I put the beans and meat on in the morning and let them simmer all afternoon. I roast peppers, chop vegetables, run to the market for things I forgot, and generally... cook. It's a meditation in flavor and textures, and sometimes it's as relaxing as yoga.
I love feeding my friends. I love watching everyone stuff their faces and grin and come back for seconds. I love that I can make something that makes everyone around me happy. It isn't about the compliments (although those are nice too) - it just makes me happy to see everyone around me sharing a meal and enjoying it.
The recipes I'm including here are starting points. I never follow them exactly. I go into these cooking sessions with an idea in mind - a concept, a list of ingredients. I taste as I go, adding a splash of this and a dash of that, until the flash of "Yes!" hits me. Then it's time to eat.
Mild Tomato Garlic Salsa
This salsa has practically no burn to it at all, so you can pile it on your food without overwhelming yourself with spiciness. We like to call it "kinder salsa" (kid's salsa) in my house.
Ingredients:
2-3 small onions
2 spring onions
3-4 medium tomatoes
1-3 cloves garlic, minced
1/2 bunch cilantro
1/2 lime, juiced
1/4 tsp black pepper
1 pinch sugar
1/2-1 tsp salt
splash or two of vinegar
Chop the onions until each chunk is around the size of your little fingernail. Chop the spring onions finely. I use about half the green part of the spring onions as well as the white. Cut the tomatoes about the same size as the onions, maybe slightly larger. Mince the garlic as finely as you can, and chop the cilantro leaves coarsely. Dump these all into a bowl and mix together.
Now add your lime juice, pepper, sugar, and a 1/2 teaspoon or more of salt. A splash or two of vinegar will help give this salsa a little "kick". Toss everything a few times like a salad, and pop it in the refrigerator to marinate for at least 30 minutes.
Roasted Red Pepper Salsa
I don't know the name of the sweet peppers I used for this recipe. I buy them at the Turkish market and have never seen the name in German or English. They look like elongated bell peppers, and the taste is very similar - slightly sweeter and less tangy than a bell pepper, but I think either one could be used successfully for this salsa.
Ingredients:
4 - 5 large, sweet red peppers
3 onions
2-3 spring onions
3-6 (or more) Holland chilies
1/2 lime, juiced
1/2 - 1 tsp salt
1/2 tsp black pepper
Splash or two of vinegar
1. Roast the Peppers
Start up your broiler. Cut the peppers in half and lay them on a baking sheet. (I recommend a layer of baking paper underneath, if you have it handy.) Leave them under the broiler for about 10-15 minutes, until the skin starts to blacken and blister as shown in the picture.
2. Chop the other ingredients
While the peppers roast, chop the onions into pinky-nail sized bits. Chop the spring onions finely, using about half or two-thirds of the green ends. Chop the Holland chilies as finely as you can - they're hot! If you can't find Holland chilies, you could try a few Thai chilies (the tiny, fiery hot peppers in many Chinese dishes) or any other fresh, hot chili you have available.
3. Peel the Peppers
When the peppers are done roasting, toss them in a paper bag or a covered bowl. The steam they produce will help soften the skins, making them easier to peel. After they have cooled a bit, slide the skins off. You should be left with big, meaty strips of roasted peppers. Chop these into chunks about the same size as the onion pieces.
4. Mix the Salsa
Toss all the chopped ingredients into a bowl. Add the lime juice, salt, and pepper. Again, a splash or two of vinegar gives this a little extra kick. Let this marinate in the fridge for at least 30 minutes.
Continue Reading!
09 May, 2008
An Evening in Little Tijuana - the Salsa Edition
Labels: low-carb, low-fat, mexican, salsa, sommersize, vegetarian
18 April, 2008
Banana Surprise Pancakes

Last week I found a recipe on 101 Cookbooks that piqued my curiosity. It was a gluten-free brownie recipe, using pureed black beans as the base. Always willing to experiment, I made a batch for a friend's birthday party.
They were delicious. As promised, no one detected the slightest hint of bean-flavor. The combination of sweet chocolate, butter, and eggs completely concealed the secret ingredient, and the beans lent an unexpected light and creamy texture that had everyone coming back for seconds.
Intrigued, I started brainstorming other ways to incorporate beans into my baked goods. Beans are chock full of fiber and vitamins, and I really don't eat enough of them. I've been longing for a decent pancake breakfast, however, and I decided to see where the beans would take me.
I started by blending together a can of pinto beans with sugar, cinnamon, and milk, and fried up a test-cake. The flavor wasn't bad, but the texture was crumbly and - not surprisingly - too reminiscent of refried beans. While pondering my options, I spotted a couple of over-ripe bananas in our fruit basket. The wheels started turning.
I've always loved banana pancakes. Back in my vegan days, I would make pancakes using only mashed bananas and flour, and I still remember the wonderful moist springiness the bananas gave those hotcakes. I grabbed a banana, blended it into the bean mixture, and tried again.
Success! Well, almost. The flavor issue was fixed, but the cakes still weren't holding together very well. I tossed in a small handful of rice flour. This time I had it. The outside of the hotcakes browned beautifully; the interior was moist and dense. Banana and cinnamon exploded in my mouth with a wonderful nuttiness from the rice flour. The beans were indetectable.
I think this is my new favorite recipe. It's low-fat, high-fiber, and isn't any harder to make than a standard pancake, as long as you have a blender. I ate the entire batch for breakfast and lunch that day, and I didn't even remember dinner that night.
1.5 cups (1 can) pinto or white beans
4Tbs milk
1 egg
2 Tbs fructose or 2.5 Tbs table sugar
1 large or 2 medium ripe bananas
1/3 brown rice flower
1/2 tsp salt
1 tsp cinammon
Heat your frying pan over medium heat.
Prepare the Batter:
While the pan gets hot, puree the beans with the milk, egg, sugar, and banana until very smooth. Mix the dry ingredients in a small bowl, and add them to the bean mixture. Mix thoroughly, and your batter is ready!
Pour the batter:
When the pan is hot enough that a drop of water sizzles, turn the heat down slightly and pour your batter in. You want these hotcakes small - hold both your hands up to make a circle, and aim for pancakes about that size. Otherwise, they take too long to cook and are hard to flip.
Cook the pancakes:
After you've poured a couple of small hotcakes worth of batter into your pan, cover it with a lid and let them cook for five or six minutes. The edges will dry out, but you won't get any air bubbles like with a traditional batter. When the edges look dry, flip the pancakes over and cook for another two or three minutes. The first side should have a nice brown look to it - although if you use table sugar instead of fructose, don't expect as much browning as in the photos. Fructose browns at a lower temperature.
Dish these up with a sliced banana for garnish. They are great plain, but a tiny drizzle of maple syrup adds a delicious kick.
31 March, 2008
Celeriac Soup

This was supposed to be an Easter post. I was even going to make a cute reference to the egg-like shape of the celery root (celeriac) that I picked up the other day... but then life intervened, and the Easter-egg reference is now all-but-useless.
I had a giant celery root (celeriac) forcibly gifted to me at the Turkish market the other day. I bought a handful of bell peppers from a shop keeper who obviously had an over-supply of root vegetables on hand, and he snuck a celeriac in my bag when I wasn't looking. It sat around my kitchen for almost a week, looking lumpy and forlorn, before I finally got around to using it for something.
That something ended up being this tangy, creamy soup. I find the taste of straight celeriac too strong - think of the inner stalks of a bunch of celery - but I found that the eggplant and lemon helped balance that into something a bit friendlier-tasting. In fact, in the future I might even use a few more eggplants for a smoother taste.
You'll need either a blender or immersion blender for this soup, but as long as you have that available you could do dozens of variations on this theme - for example, adding curry powder, or some chopped apples. (Think of the scrumptious flavor of fried apples and onions, then imagine the pleasant surprise of finding apples in your dinner soup.) Leave out the bacon for a vegetarian version, substitute soy milk for a vegan treat. I think it would be hard to go terribly wrong with this base.
Celeriac Soup
I left this soup rather thick, but you could thin it down with more milk if you want. Leaving it thick, I think it would make a nice veggie dip as well - especially with a bit of tahini blended in.
Ingredients:
2 Leeks
1 Celeriac
2 small eggplants
1 cube vegetable bullion
4 ounces bacon, cut into small pieces
1 orange bellpepper, chopped (reserve about 1/4 for garnish)
6 Tbs milk
2 Tbs lemon juice
about 1/2 tsp each, cinnamon and pepper
Prepare the Celeriac and Leeks:
Slice leeks thinly, and cut the celeriac into cubes about the size of dice. Dump them all in a pot and just cover with cold water. Crumble your boullion cube over the top, and bring to a boil. Turn down the heat and simmer until very soft, about 30 minutes.
Broil the Eggplant:
Meanwhile, halve the eggplants and put them under the broiler until the skins wrinkle and they get more-or-less squishy. This should take about 20 minutes.
Brown the Bacon and Bell Peppers:
While the eggplants are broiling, brown the bacon over medium-high heat until the fat is mostly melted off. Dump off most of the fat, leaving just a tablespoon or two. Add the bell pepper and sautee for a few minutes, until the pieces are softened. Turn the heat off and let this sit while you prep the eggplant.
Peel the Eggplant:
When the eggplant is soft, pull it out of the oven and let it cool a few minutes. When you can handle it comfortably, peel the skin off. You should be able to just grab the skin on one and and peel it back, like a banana. Throw the skin away.
Blend the Soup:
Chop the eggplant into rough chunks, to help it blend more easily. If you have an immersion blender, you can can add this to the pot with the celeriac and leeks. Hold off on the bell pepper for now. If you have a regular blender, dump the celeriac, leeks, cooking liquid, and eggplant in together. Add about half the milk and start blending. Add the rest of the milk slowly, blend thoroughly, and add the lemon juice. When the soup is nice and creamy, add the bell pepper and bacon and blend for a few more pulses. You want to leave a little bit of texture here. Stir in the cinnamon and pepper.
To Serve:
Dish up the soup and sprinkle a bit of chopped bell pepper on top for color. Sprinkle with cinnamon and pepper (fresh ground, if you have it).
Continue Reading!
04 March, 2008
Homemade Hummus

I eat a lot of Middle Eastern food here. Falafel, schawarma, döner... I can't get enough of them. And the hummus you get with a plate of schawarma meat: the creamy, mild sweetness of the chickpeas blending with tart lemon and sharp garlic. The little drizzle of olive oil over the top. I could eat it all day long.
I haven't made hummus myself since college, but the urge has hit again lately. Without a blender or food processor in the house, though, I was stuck. Until last weekend. My roommate permanently endeared himself to me by coming home with a hand-held submersion blender. Pureed soups and sauces are just a few quick flicks of the wrist away. And dips. And... hummus!
With a blender, food processor, or immersion blender, this is quite a simple recipe. You should be able to find tahini in the "ethnic foods" aisle of most large grocery stores. If that doesn't work, you could try a middle eastern food shop, or just leave it out. The hummus will still be delicious without it.
It takes a little pre-planning to make this with dried chickpeas, but the improvement in flavor and texture is really worth the time. If you need to whip it up in a rush, substitute a 16 oz can of chickpeas and go to town. 
Homemade Hummus
I like my hummus with enough garlic to stave off vampires for weeks. If you aren't so worried about being bitten, start with two cloves, blend them in, and add more after tasting.
Ingredients:
3/4 cups dried chickpeas
2-4 cloves garlic, chopped
1/2 lemon, juiced (about 2-3 tablespoons)
1-2 tablespoons tahini
1 tsp salt
1 tsp cumin
Parsley, to garnish
Cooking the Chickpeas:
Cover the chickpeas in water and soak for about 20 minutes. Dump out the soaking water before cooking. This helps avoid any bitterness. Put the chickpeas in the cooking pan, and add enough water to come a few inches above the top of them. Bring water to a boil, and cook over low heat about an hour to an hour-and-a-half, or until tender. Don't add salt, as this will make the beans tougher and increase the cooking time.
Preparing the Hummus:
When the chickpeas are cooked (or, if you are using canned), drain and rinse them. Dump them into your blender, or a mixing bowl if you're using a hand-held blender. Add the lemon juice and about 1/2 a cup of water to help with blending. While blending, add the tahini, garlic, salt, and cumin. Blend until the hummus is mostly smooth, with just a bit of texture. Add as much water as you need to reach your preferred consistency. I like mine fairly thick - if you want it thinner, you may need to adjust your seasonings to compensate. As a variation: I also like this hummus with about half a cup of minced parsley mixed in. The flavor reminds me of tabouleh salad, and the parsley will help fend off the inevitable garlic breath!
To Serve:
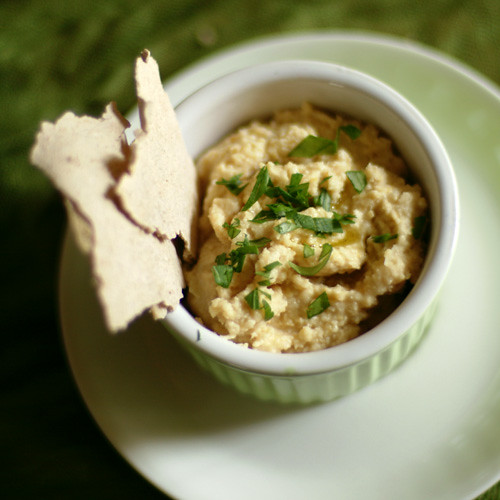
Pour your hummus into a serving dish. Make a small well in the top, and add a tablespoon or two of olive oil. Chop a few leaves of parsley and sprinkle over the top.
Continue Reading!
Labels: hummus, recipe, vegetarian
25 February, 2008
Simple Moroccan Spiced Chicken and Eggplant

Last week at the Turkish Market, I walked by one of the spice stalls and noticed a small sign in front of the cashier: "Real Saffron from Iran. Available only while supplies last. Half gram, €3."
I didn't know what I would use it for, but I'd never seen saffron for sale before. I couldn't pass up the chance to try it. Walking up to the stall owner, I said "I'll take half a gram of Saffron, please."
This is when things got a little weird. The man's expression turned wary. "3 Euros," he replied quietly. Glancing nervously from side to side, he reached into a small compartment hidden behind his table. He fumbled for a moment, still looking around, and finally handed me a small, circular, plastic case containing a small pile of delicate red tendrils. I payed, thanked him, pocketed the saffron, and walked away.
I turned to my friend. "Did you see that? Saffron is legal, right? Why do I feel like I was just part of a drug deal?" 
I still haven't decided what to use the saffron for, but as I was researching some possibilities, I found myself reading about Moroccan style cooking. The following recipe is probably not precisely authentic, but the blend of eggplant, lemon, cumin and cinnamon is a Moroccan-inspired treat for the senses.
Moroccan Spiced Chicken and Eggplant
It isn't in the photo, but this pairs wonderfully with a side dish of roasted eggplant. Roast the eggplant in the oven while the chicken cooks, then add it to the pan a few minutes before serving to absorb the flavors.
For each serving you will need:
1-2 chicken pieces
1/2 - 1 small eggplant
1 medium onion
Juice from 1/2 a lemon (about 1.5 Tbs)
Seasoning Blend (per serving):
2 tsp. cumin
1/2 tsp. cinnamon
1/2 tsp. pepper
1/2 tsp. salt
Preparation:
Rub both sides of each chicken piece with the seasoning blend. You won't use all of it at this point, but season the chicken liberally. You can do this with the skin on, or remove it. I like to remove most of the skin, but leave a little bit around the edges for flavoring. Let the chicken sit for about 10 minutes so the spices have a chance to absorb.
While the chicken is resting, turn your broiler on. Cut the eggplant(s) in half, and remove the stems. Put the eggplant cut-side-down on a baking sheet under the broiler. You'll leave it around 10-15 minutes, until the skin is puckered and wrinkly, and the eggplant is soft.
Cooking the Chicken:
As the eggplant cooks, heat a frying pan over high heat. When a few drops of water sprinkled in the pan sizzle, it's ready. Add the chicken pieces, skin side down, and brown them. As they brown, thinly slice the onion(s).
Sprinkle about half of your remaining seasoning blend into the pan, and add the onion. Stir briefly. Juice the lemon(s), and drizzle the juice evenly over the chicken and onions. Cover the pan immediately to retain moisture, and turn the heat down to medium.
Adding the Eggplant:
Check on the eggplant. When the skin is wrinkly, pull it out from under the broiler. Let it cool briefly, then peel the skin off. It should have separated from the flesh and will pull away quite easily. Throw the skin away, and cut the eggplant into small chunks.
Add the eggplant to the chicken and onions. Stir briefly, and flip the chicken pieces for even cooking. Cover the pan again, and continue cooking until chicken is well-done. Stir occasionally to prevent sticking.
To serve:
Before serving, taste the eggplant mixture and add more of the seasoning blend if desired. Serve 1-2 pieces of chicken per person, with the eggplant as a side dish.
Continue Reading!
Labels: chicken, eggplant, gluten free, meal, Moroccan, recipe, saffron, sommersize, vegetables
12 February, 2008
The Celery Blues
I'm generally known for having a penchant for odd vegetables. Some of my friends appreciate this, but there are others who run screaming every time I suggest making Brussels sprouts, kohlrabi, or whatever else happens to be on the menu. Which is why I find the following conversation even more amusing than it would otherwise be:
I'm standing in my friend's kitchen. I've just pulled a celery stalk from the bunch I purchased moments before at the supermarket. I'm pretty excited, because I haven't seen a celery bunch in many months. Living in California, the land of year round greens, I never realized that celery is a highly seasonal vegetable in other parts of the world.
Me: (crunch. crunch.)
Friend: What are you eating?
Me: Celery.
Friend: Celery? I don't think I've ever seen that before.
Me: Really? I know I can't find it very often, but you've never had it before? Here, try a piece.
Friend (crunching thoughtfully): Ugh! It's so bitter! It's even more bitter than celery root!
Me: Well, yeah, but... it's crunchy. And, um, it's not really that bitter. I mean... it's sort of salty and tangy, too.
Friend: Are you sure you're supposed to eat it raw?
Me: Of course! This is a totally normal American snack food. You should try it with cream cheese. Or peanut butter! (pause) Oh, man, I wish I had some peanut butter.
Friend: You eat that with peanut butter? Really?? God, you Americans eat some strange things.
Upon further consideration, I understand why it isn't a very popular vegetable over here. All the celery I've encountered thus far has been painfully sub-par. The stalks are somehow the wrong density; they end up too watery and stringy, and they're more tough than crunchy.
The flavor is there. It still works as a soup additive. But I really can't blame anyone for not wanting it on their veggie platter.
Continue Reading!
Labels: celery, stories, vegetables
10 February, 2008
White Chocolate Hazelnut Cake

A friend of mine collects bath products. Not just bath products, but bath products scented like food. A quick glance in her shower finds things like "Moisturizing Maple Syrup Scrub," "Pecan Pie Body Wash," and "Vanilla Butter Cream Body Frosting." They smell astonishingly close to the real thing. Mouth-wateringly so. I've been known to occasionally sniff my way through her shower shelves in lieu of dessert.
A few weeks ago I noticed a bottle titled "White Chocolate Hazelnut Cake," by the company Philosophy. Not only did this one smell delicious, but the italicized script covering the front of the bottle turned out to be a recipe! And not only was there a recipe, but it called for breadcrumbs, which I had made just the day before. Clearly this was meant to be.
I wasn't completely sure if the recipe was intended for actual cooking purposes, or just for decoration, but it looked workable. I just needed an excuse to bake a cake.
Last weekend, we had a small dinner party, and I finally had my chance. I creamed, whipped, beat, and folded; then popped it all in the oven and hoped for the best.
It was amazing. A sprinkling of cinnamon lent a flavor akin to carrot cake, but the texture was of a class all its own. It was tender and moist; airy with beaten egg whites, rich with yolks and white chocolate. The coarse breadcrumbs I used gave it an unusual, but wonderful, mouth feel. I'm not normally a "sweets" person - but somehow the 5 of us managed to polish off the entire 9" cake in a matter of minutes.
White Chocolate Hazelnut Cake
adapted from Philosophy's recipe
Since the egg whites are so important to the texture of this cake,
I highly recommend this wonderful writeup on proper whipping
and folding technique.
6 ounces white chocolate, coarsely chopped
2/3 cup sugar
3/4 cup butter
8 eggs, separated
2/3 cup bread crumbs (gluten-free, if need be)
1/3 cup ground hazelnuts
1 tsp. ground cinnamon
1/2 tsp. salt
Preheat oven to 350° F
Butter a 9" Springform pan, and lay a circle of baking paper on the bottom.
First, melt the white chocolate in a double boiler. Don't use the microwave for this - white chocolate scorches too easily.
Separate the eggs, putting the whites in a large mixing bowl. Make sure not even a touch of yolk gets in to the whites.
Combine hazelnuts, bread crumbs, cinnamon, and salt in a small bowl and mix well.
Cream the butter and 1/3 C. sugar in a large bowl until soft and fluffy. Add the melted white chocolate and mix well. Beat the yolks into the butter, one at a time; continue beating until the mass is smooth and creamy. Stir the hazelnut-breadcrumb mixture into the butter and eggs, and mix thoroughly.
Measure the remaining 1/3 C. sugar and have it ready.
Beat the egg whites until soft peaks form. While beating, slowly pour the sugar into the whites. Continue beating until the peaks become stiff.
Stir about 1/4 of the egg whites into the batter, then gently fold in the remainder.
Pour the batter into your prepared pan, and bake for 45 min.
White Chocolate Glaze
Prepare this after cake is cooled
8 oz. white chocolate
1/2 c. heavy whipping cream
1 pinch sea salt
Chop the white chocolate into small pieces, and dump into a medium-sized bowl.
Heat the cream in a small saucepan just until bubbles form at the edges. Quickly pour the hot cream over the chocolate. Leave it to melt for about 1 minute, then add salt and stir until smooth. Let it cool slightly, but make sure it remains liquid.
To Assemble:
When cake is cooled, remove the sides from the springform. If there is a raised edge along the outside of the cake, trim it away. Turn the cake out onto a serving dish, bottom-side up.
Pour the warm glaze over the cake, letting it drip down the sides. Sprinkle with chopped hazelnuts for garnish.
Continue Reading!
Labels: cake, dessert, gluten free, recipe, sweets, white chocolate hazelnut