09 January, 2009

Adventures in San Francisco


Well, it's been a crazy couple of months since I posted. I guess I've passed right over Halloween, Thanksgiving, Christmas and New Years. Pretty much every holiday that could possibly be associated with food, except maybe St. Patrick's day. Somehow in the middle of my own cooking, I didn't get the time to sit down and write up a recipe.

So, I'll start at the beginning. Way back in November, I flew back to California to see my family for Thanksgiving. While I was there I hopped up to San Francisco for a few days to visit a friend. And while I was in San Francisco - in the fabulous, happening, bar-and-restaurant-filled Mission District - I had my first Mexican Food Experience in an entire year.


I managed to make it back to my table with a wobbling stack of three over-filled salsa containers and one precariously-balanced pickled Jalapeno, spilling only a minimal amount of salsa on my shoes in the process. Most people were polite enough not to stare, even after I whipped out my SLR camera with it's zoom lens and started photographing my salsa as if it were a work of art. And really, isn't it? Tangy-limey-hot-cilantro-y goodness dumped all over...


... two sizzling hot tacos filled with carne asada and carnitas, respectively. Smothered in cilantro and chopped onions and served in a warm corn tortilla... wow. I made pretty decent tacos in Germany, but there is really something extraordinary about tacos from a good taqueria that just can't be replicated.

My friend looked at me from across the table at one point - I had a Jalapeno in one hand and a taco in the other, with one bite taken out of each, and what I imagine could only have been an expression of pure bliss on my face. "You look so happy right now," he said.

And I was. Being a tourist in your own country lets you experience simultaneous novelty and nostalgia. It floods you with old memories, and at the same time makes ordinary activities exciting and new. It makes ordering food in your native language a special treat. And it makes you eat ridiculous things like this, just because you haven't had a pickled Jalapeno in 12 months:

Yes. I did eat all but one of those peppers. And oh wow, do I need to figure out where to buy those in Berlin!
Continue Reading!

27 October, 2008

Cardamom Orange Oatmeal


I've been happily eating oatmeal for breakfast, nearly every morning, for months. I know to most people that probably sounds monotonous, not to mention conjuring up images of beige mush being slopped onto a plate, alá Oliver Twist. But bear with me a minute - oatmeal really can leave you asking "Please sir, can I have some more?"

I've always been a fan of oatmeal - the more textured and less mushy, the better. Minute oats are not my friend, and when I discovered steel-cut oats I dove into the delightful chewy bowlfuls spoon-first. And then I stopped eating gluten.

There are no gluten-free oats to be found in Germany, as far as I can tell. They're expensive in the States, but I've never seen them here at all. So when I first stopped eating gluten, I didn't touch oats for almost 8 months. I tried buckwheat flakes, and millet flakes... and even rice flakes. But it just wasn't the same.

I started realizing, though, that I'm OK with trace amounts of gluten. It doesn't seem to give me any allergy problems. So, since oats don't actually contain gluten in their own right, and it's just an issue of cross-contamination, I gave oatmeal a second chance. I was overjoyed to find that my incredibly cheap and versatile breakfast standby is back on the menu!

Since then I can't get enough of the stuff. I often don't even cook it these days. For the most part I just eat it muesli style, uncooked with milk poured over the top. Sometimes with some chopped apple or raisins; usually just plain. But I think I've found a new favorite - something perfect for a hot bowl of oatmeal on a cold autumn morning. Plain old oatmeal is magically transformed into a gourmet treat with a dusting of spicy, fragrant cardamom and a sprinkling of homemade dried orange peel.


This flavor combination was inspired, interestingly enough, by one of the ice creams available at the Bi-Rite Creamery in San Francisco. I haven't been there yet, but with flavors like orange cardamom, balsamic strawberry, and salted caramel on the menu, it's definitely on my schedule when I visit in November.

I really can't say enough good things about cardamom. When I first discovered it years ago as an ingredient for chai tea, I didn't realize how many other uses it had in the kitchen. My neighbor here once lived in Egypt for a number of years, and he introduced me to the wonderful combination of coffee brewed with cardamom. It's also used extensively in Scandinavian baking, and is an ingredient in some savory Indian and North African dishes. In short, I suggest you go buy yourself some and start experimenting!

As a note, I should add that ground cardamom loses it's flavor rather quickly. It's best to buy the whole pods and grind them down as needed. They do have more flavor that way. But, to be honest, those seed pods can be a royal pain when you're in a hurry. I find myself wishing for a little packet of pre-ground cardamom almost every time I use it - especially when I'm trying to get out the door for work. So really, just buy a small amount of ground cardamom, and keep it as tightly sealed as you can. The flavor might not be quite as spectacular, but you'll sure use and enjoy it a lot more often.


Quick-and-Easy Orange Cardamom Oatmeal
I'm usually not a fan of microwaved food, but let's face it, when you're in a rush sometimes it's a lot more convenient. If you have time, make this with steal cut oats and the full cooking time, but I'm quite happy with my quick n' dirty version.

Ingredients:

1/2 C. Oatmeal (certified gluten free, if need be!)
1/8 - 1/4 tsp ground cardamom
1/4 tsp finely chopped orange peel
Milk/water to cover

Put your oatmeal in a good-sized, microwave-safe bowl. Sprinkle in the cardamom and orange peel, then add milk and/or water until it just covers the oats. I use about half milk and half water for mine. Stir briefly, then pop it in the microwave for 2 minutes. If you use minute-oats, they will be fully cooked and soft. I make this with regular oats, and after two minutes it comes out with a delicious chewiness that will get rid of any preconceptions you might have about mushy oatmeal!
Continue Reading!

22 October, 2008

Purple Potatoes


I've always been one to experiment with colors. I think they improve everything. Growing up with white walls in our house, I pleaded for yellow. Born with brown hair, I've dyed it every color under the rainbow. And I've been known to experiment with the color of my food on more than one occasion.

When I was a kid, I loved the Dr. Seuss book Green Eggs and Ham. Not just liked, but loved. Obsessively, perhaps. I know I convinced my dad, more than a few times, to dye my scrambled eggs green, and I remember being disappointed that there was no was to pull it off with poached eggs.

There's another instance that comes to mind, as well. When I was 8 or 9 years old, my mom had the flu, and my dad and I cooked dinner for her. I don't remember the whole menu, but I know for sure mashed potatoes and gravy were part of the feast.

You might be asking yourself right now, why I still remember this particular instance of mashed-potato making. Well, that would be because, once again, I decided to play with colors. I wanted to make the potatoes more festive, to cheer my mom up and help her feel better.

If you were sick in bed with the flu, wouldn't you want a heaping serving of turquoise mashed potatoes with purple gravy? (Sorry, Mom!)

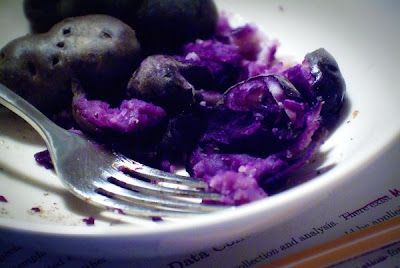
At any rate, given my long history with oddly colored foods, you can imagine my excitement when I stumbled onto my latest and greatest discovery at the Turkish market. Purple potatoes!

I actually didn't realize quite what I'd gotten into when I bought them. I thought they just had deep purple skins. It wasn't until I boiled them up one night for dinner that I realized what a gem I had found. Digging in with my fork, I expected the sharp contrast of purple skin with white potato flesh - but there, instead, was this bright violet, the color of springtime flowers!

I never knew such a potato existed. They're exquisitely colored, creamy tasting, and mildly sweet. And I've read that they contain a higher level of anti-oxidants, as well. Great flavor with extra nutrition, to boot!

I ate them with a sprinkling of garlic and salt, but if I'd known beforehand what I was getting into, I would have tried a sprinkling of walnuts and maybe a dash of cardamom.

These would make a spectacular potato salad as well, with or without regular potatoes. Rather than the usual heavy mayonnaise dressing, I'd like to try a salad with some walnuts, shallots, rice vinegar, and parsley for starters. Let this sweet and unusual potatoes shine through, complemented by the seasonings - but don't drown them like you would an ordinary white potato.

I don't know how easy or difficult these might be to find in the States, but I'd have to imagine someplace like Whole Foods would likely carry them. If you do stumble across them, let me know, because I'll be back visiting for Thanksgiving and I'd love to have some at dinner!
Continue Reading!

29 September, 2008

A Simple Roasted Corn and Cilantro Salad


Going to the Turkish market on Friday evening is a sure way to get a huge pile of veggies for just a little bit of cash. As the day ends, there's a surplus of one thing or another, and the vendors would rather sell it off than haul it home. If you wait until closing time, they'll send you home with bags full of produce for 50 cents a pound.

The trick is, you never know what the surplus will be until you get there. Some weeks I come home with two pounds of red bell peppers for a Euro. Sometimes it's a whole crate of ruccola. Last week, it was 6 ears of corn.

I didn't feel like eating 6 ears of corn on the cob by myself, so I decided salad was the way to go. Slicing the kernels from the cobs, I fried them quickly with a dab of butter and a splash of lime juice. Mixed with some chopped tomato and an enormous bunch of cilantro, I found myself with a fresh, tangy bowlful of Mexican-inspired goodness.

I swear, I don't think I will ever grow tired of the taste of cilantro and lime. Now, if only I could track down some Cheddar cheese in this country...


Roasted Corn Salad
This salad is great on it's own, or makes a nice side for refried beans and a chunk of cornbread.

Ingredients:

6 ears fresh corn, kernels removed (or 2 cups frozen kernels)
1 Tbs butter or oil
2 limes, juiced (or about 1/4 c. juice)
1 bunch cilantro
1 tomato
1 red bell pepper
1 tsp salt
Freshly ground pepper
Cayenne pepper to taste

1. Roast the Corn
Heat the butter in the pan until it's sizzling hot, and add the corn. Cook over high heat, stirring occasionally, until the corn starts to char in places. Continue stirring and cooking until most of the kernels have dark brown marks on them. Dump the corn into a large bowl and let it refrigerate while you prepare the rest of the ingredients.

2. Prepping the Veggies
Chop the cilantro finely. Chop the tomato and bell pepper into pieces roughly the size of the corn kernels. If you haven't already, juice your limes.

3. Assembling your Salad
Pull the corn out of your fridge, add the chopped veggies, lime juice, salt and pepper. Make it as spicy or mild as you like with cayenne. It tastes best after marinating for a few hours, but it's damn good straight away as well.
Continue Reading!

27 September, 2008

Tip of the Week: Dry Your Own Orange Peel


Last week, as I was buying the ingredients for my rye bread, I saw a little packet of dried organic orange peel for sale. I think it cost around 2.50 Euro, which isn't all that bad. A little orange peel goes a long way, right?

Then I started thinking about it. How long has that orange peel been sitting in it's little packet? And why would I spend 2.50 for dried peel, when I can buy a whole organic orange for fifty cents?

I bought my orange, headed home, and devoured it. Then I chopped up a little corner of the peel to use in the recipe. And I stood there looking at the rest of the peel sitting on the counter. I'm already chopping, I thought, why not just keep going and dry it myself?

It really is as easy as it sounds. Actual working time was less than 5 minutes, and now I have a little jar on my counter with enough dried orange peel to last me for months.


To make your own:

Take an organic orange - you don't want all the pesticides and wax from a normal one, trust me - and cut the peel off carefully with a sharp knife. You want to cut close to the surface of the peel, leaving as much white pith behind as you can. (You can see in the photos that I just peeled mine normally, but I really shouldn't have. The pith is more bitter than the orange part of the skin.)

Chop the peel finely, spread it on a baking sheet, and let it dry in a 200° Farenheit oven until it is dry but still a bit flexible. It should take around 20 minutes, depending on how finely you chopped it.
Continue Reading!

23 September, 2008

A Blunch Casserole


Sunday afternoon in Berlin. It becomes a social dead zone the minute the weather turns chilly. You wake up after a Saturday night out, and know that your friends are probably just crawling out of bed as well, rubbing the sleep out of their eyes. The shops are all closed. Without nice weather, there's really no compelling reason to leave the house.

In the summer, of course, someone might be barbecuing in the park, or headed to a lake outside of town. When summer hits Berlin, the whole city suddenly floods outdoors to capture every possible minute of sunshine. But this time of year, with the gray clouds looming overhead, there isn't much to do but wrap yourself in a blanket and snuggle up to your mug of coffee. We're slowly becoming housebound again.

As I head into my third fall here, I have to say... I miss the warm weather, of course, but more than that I miss the social feeling of summer. Especially Sundays. When the sun is out, and with the stores closed, you have no excuse not to be outside. You run into friends all over the place - in the park, on a bike path - and there's usually a few minutes to just sit around and relax together.

Sundays are special. On weekdays everyone's tired from work. On Friday or Saturday night, there's a sudden need to be out on the town, doing something exciting. On Sundays, though, no one's got anything to do. But as fall creeps up with winter on its tail, we need compelling reasons to get up and be sociable again.

And what better reason than food and good company?

So, this past Sunday I decided to invite everyone over for a late, late brunch. (I guess technically lunch is what you would call a "late brunch," but humor me for a minute, OK?) 3pm Sunday afternoon. It gives us all just long enough to revive ourselves after a long Saturday night, have a snack, and meet up for... whatever you would like to call the meal. Blunch, anyone?


I thought about getting really fancy with the cooking. I wanted a potato dish, a cheese-and-egg dish... I even planned ahead and did some cooking beforehand. (Boiling potatoes before heading out for the night is never a bad idea!) In the end, I had my own slight hangover to deal with, and so I decided on an all-in-one casserole instead of two separate ones. And man, was that a good idea. Potatoes, zucchini, leeks, cheese, eggs - I could have kept going, but I ran out of room in the pan!

As side dishes, we just had some crackers, cheese, cold cuts, etc off to the side. Along with the loaf of banana bread (made with guidance from Gluten Free Gobsmacked), we were all stuffed by the end of the afternoon. And the banana bread was devoured, I kid you not.

Sorry I only have one photo this time around - I was too busy cooking and eating and enjoying the company to go crazy with the camera!

Potato Zucchini Breakfast Casserole

Boil the potatoes the night before and let them sit in the fridge overnight.
The proportions in this recipe are open to your own interpretation. My original served about 12 people and used 16 eggs. I've scaled this down to feed about 4, but you can adjust it as you like - I think it would be hard to go too far wrong.


Ingredients:

1-1.5 lbs potatoes (or about 4 fist-sized potatoes)
1/2 lb zucchini (2-3 medium zucchini)
1 leek
1/2 - 3/4 c. shredded cheese (I suggest Swiss)
5 eggs
3 Tbs. milk
1 tsp. salt, divided
1/2 tsp. rosemary
1/4 -1/2 tsp. garlic powder
1/4 tsp. black pepper

Preheat your oven to 350° and lightly butter or grease the bottom and sides of an 8x8 or 9x9 in. casserole dish.

1. Prep work:
Slice the potatoes thinly, cutting lengthwise along the potato. About 1/8 in. is good, but you can always go thicker or thinner according to preference. Slice the zucchini into rounds as thinly as you can. Trim the tough, leafy end off the leak - you can leave some of the green part attached, but make sure it's just the thinner, tender part. Slice the leek thinly and then chop haphazardly into smaller bits.

In a medium-sized bowl, beat the eggs with the milk and 1/2 tsp. salt until light and fluffy.

2. Assembly
Start with a layer of potatoes at the bottom of the casserole dish. Overlap the slices a little bit, like you would for lasagna noodles. Sprinkle about half of the chopped leeks over the top, then half the shredded cheese.

Follow this up with the zucchini. Cover the the potato-leek-cheese combo completely in zucchini slices, and keep layering until all the zucchini is used up. At this point, sprinkle the rosemary, garlic, pepper, and about 1/2 tsp. of salt over the zucchini.

Top the zucchini layer with a final layer of potatoes, followed by the rest of the leeks and the cheese. Finally, pour the beaten egg over everything. It should fill the casserole dish just to the top of the veggies, but if you find yourself a little low you can beat another egg with a splash of milk and add it in.

Cooking:
Bake the casserole for about 45 min. - 1 hour, until it is set in the middle. Let it cool slightly, and dig in!
Continue Reading!

16 September, 2008

Mission Accomplished


The weather here has suddenly turned cold and wintery, and I, in turn, have started cooking as if my life depended on it. In the last week I've made roasted corn salad, corn bread, and brownies in mass quantities, all now stocked away in my freezer. Except for the corn salad. That only lasted a couple days in the fridge before I devoured it. (And don't worry, there are recipes to come!)

After cooking an enormous pot of soup yesterday, I decided that I urgently needed Russian black bread to go with it. I managed to find a recipe on an ancient gluten-free message board, and off I went to the kitchen. I was a little nervous as I put it in the oven, because after the addition of several dough-additives that I haven't experimented with before, the raw dough was feeling a bit rubbery.

Turns out that was a good thing.

Ladies and gentlemen, I have a loaf of gluten-free bread that my flat mates, my friends, and even my impossible-to-feed younger brother would happily scarf down. And I'm not sharing.

After waiting impatiently for the dough to finish rising and baking, I pulled this beautiful, rustic bread out of the oven and tapped the bottom as instructed. It sounded hollow. And the loaf had... spring! Elasticity, even. It didn't feel like a brick in my hands. It felt like a loaf of bread. And the crust was perfectly brown and pliable - it hadn't hardened into an impenetrable shell like I've grudgingly become accustomed to.

I managed to refrain from digging into it long enough to take some photos - which, as I waited impatiently for the camera battery to charge, was a lot longer than I would have liked. But it was worth the wait. I cut off a slice, and... well, first of all, it actually let itself be sliced. It didn't crumble in my hands. I had a perfectly-formed slice of lovely, soft, airy bread that looked and felt like actual bread. And when I bit into it - heaven. A soft velvety crumb with just the right chewiness. It reminded me of the homemade white bread I baked with my mom as a kid.

But the flavor was even better. The heady taste of caraway seeds, cocoa, and tiny morsels of orange peel exploded in my mouth - I've never had rye bread this good before. The orange peel makes this hands down my favorite recipe in a long time. I know the ingredients may not be things you have on hand - even if you're a regular gluten-free baker - but trust me, it's worth it to find them. And once you have them on hand, there will be enough left for several more delicious, fluffy loaves after you've polished this one off.

[Note: I should have been more clear about the extra dough additives - Sure-Jell, gelatin, and xantham gum are used to help improve the texture of gluten-free bread. Since gluten (the protein in wheat and some other flours) is very stretchy, it allows yeast breads to rise and gives them their distinct texture. Without any xanthan gum or other binding agent, gluten-free breads don't rise properly, and their texture is... not very good, to say the least.

If you can eat gluten, and want to try this recipe, just use three cups of normal bread flour in place of the flour/corn starch combination, and omit the gelatin, Sure-Jell, and xanthan gum.]


"I Can't Believe It's Not Gluten" Black Bread
Adapted from Mike Jones' recipe on enabling.org

If you add the gelatin with the dry ingredients, be sure it is designed to dissolve in cold water. If you have traditional gelatin, dissolve it in the warm milk with the liquid ingredients. You'll find Sure-Jell fruit pectin with other jelly-making supplies, most likely near the baking section.


Dry Ingredients:
1.5 C. white or brown rice flour
3/4 C. Buckwheat flour
3/4 C. corn starch
1 packet yeast
1 tsp. plain gelatin (cold-dissolving)
1 Tbs Sure-Jell (fruit pectin)
1Tbs xanthan gum or guar gum
1/2 tsp salt
2 Tbs sugar
1 Tbs unsweetened cocoa powder
1 Tbs corn meal
2-4 Tbs caraway seeds
1 tsp finely grated orange peel

Wet Ingredients:
1 C. milk, warmed to about 80°
1/2 C. strong coffee, 80° or room temperature
2 eggs, room temperature
2 Tbs olive oil
2 Tbs molasses


Turn the oven onto the lowest possible setting.
Grease a baking sheet lightly and sprinkle with cornmeal.

1. The dry ingredients:
Combine the dry ingredients in a large bowl and mix thoroughly. The yeast can be mixed directly with the flour and dry ingredients - but if you think your yeast might be getting a bit old, proof it first and then add with the wet ingredients.

2. The wet ingredients:
In a medium bowl, warm the milk and coffee slightly (and make a mug for yourself, while you're at it!). Beat in the eggs, olive oil, and molasses.

3. Making the dough:
Make a well in the dry ingredients and pour the liquid. Stir until everything is completely combined and the dough is pulling cleanly away from the sides of the bowl. If you need a bit more liquid, add milk or coffee a teaspoon at a time. Don't do what I always do a free-pour directly into your dough. You don't want soggy bread dough, trust me.

4. Knead and rise
Knead the dough in the bowl for a few minutes to help mix everything thoroughly. This is a stiffer dough than many gluten-free blends, but it still won't knead like normal gluten dough, so don't worry about it. Turn the dough out onto the prepared baking sheet and shape into a rough loaf. Turn the slightly-warmed oven off and let the dough rise for about 90 minutes.

5. Baking the bread
When the dough is done rising, turn the oven temperature up to 350°, leaving the bread inside. Bake for 50 minutes, until the loaf sounds hollow when you tap the bottom. Remove the loaf immediately and let it cool on a wire rack.
Continue Reading!